ShopDreamUp AI ArtDreamUp

Deviation Actions


Badge Awards
Description
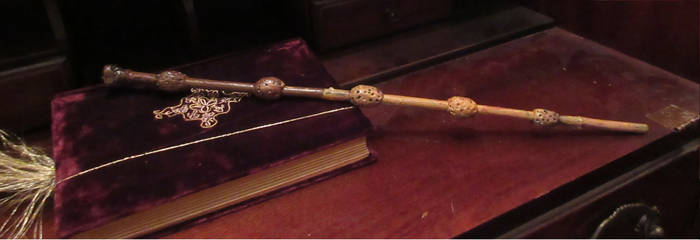
A customer of mine at work requested a Unicorn Horn for her collection. So I went about finding the best way to make one without breaking the bank. I considered dowels and paper mache. I considered pipe insulation and spray foam.
In the end, the answer came to the counter where I worked when another customer decided not to buy some Crayola air dry clay. I thought that I would give that a shot.
It not only worked out perfectly, but it only took about an hour to sculpt and paint. Drying took several hours in the oven. It ended up being just under 12" in length.
I'm not sure that I'll need to give it any glamour or glitter. But I will definitely seal it with a semi-gloss clear coat.
Who'd have thought that it would be so easy to make a Unicorn Horn?
Here are the basic instructions...
To make the unicorn horn, you will need to roll out the sculpey into a tapered, snake-like length of about 12-14 inches or 35 cm. and 1 1/4 inch or 3 cm thick. I have been using Sculpey Ultra Light on the last couple of horns. It is lighter weight, yet more flexible and shatter-proof than regular Sculpey or Super Sculpey. But it bakes the same way, using the package instructions.
You may want to use some latex or vinly gloves to reduce/prevent fingernail gouges or fingerprints. Gently pull one end of the snake and twist until you have a somewhat narrow end or point. Then softly twist the length of the snake like a corkscrew until you have the desired amount of angled ridges. To prevent fingerprints, you can use latex gloves or a soft cloth to hold the snake as you twist in the ridges. You can mix in few drops of baby oil to soften the clay, if it is too stiff for twisting. It may take a couple of tries to get a pleasant result. Don't give up!
Once you have twisted the horn, take the same soft cloth to rest it upon for the baking process to prevent the clay from settling/flattening on one side.
When the horn is baked, you should give it a quick sanding to reduce any imperfections or fingerprints. Then you can paint it.
I did a base coat of black acrylic paint. Then I did a dark brown, slightly transparent, thinned with water so that some of the black still shows through the brown. After that, I did a light brown/tan layer of color with a sponge and let that dry. The final coat was a light ivory with a sponge as well. The sponge was used lightly on the raised surfaces of the ridges, leaving the recessed crevices dark for contrast. The sponges that I use are cut-up chunks of upholstery foam(couch cushion type). It has a great texture for most paint work that I do and gives a nice, natural-looking result.
If you want a practically invisible way to mount it, use some clear, vinyl sheeting(The kind used for convertible top windows and rain slickers) cut to about a 2-inch by 24 inch strip. Then cut a hole in the center that is slightly smaller than the widest end of the Unicorn Horn. Poke the horn through the hole until it is snug.(Nearly all the way through) Then tack it in place with some hot glue. You can then adjust it as a headband for either you or your fashion-forward critter.
~D
Image size
526x401px 160.73 KB
© 2010 - 2024 Pirkleations
Comments128
Join the community to add your comment. Already a deviant? Log In
This is also really helpful. Thanks for posting how you made it. So cool!